How Do I Transfer My Wix Website to Another Account
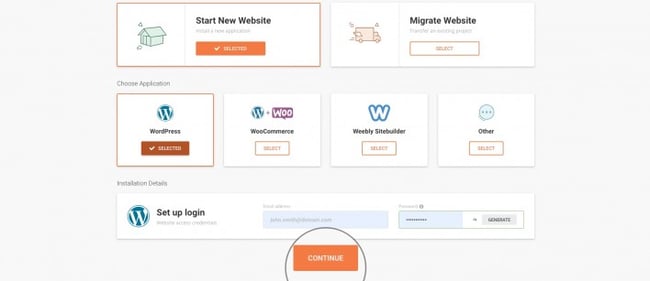
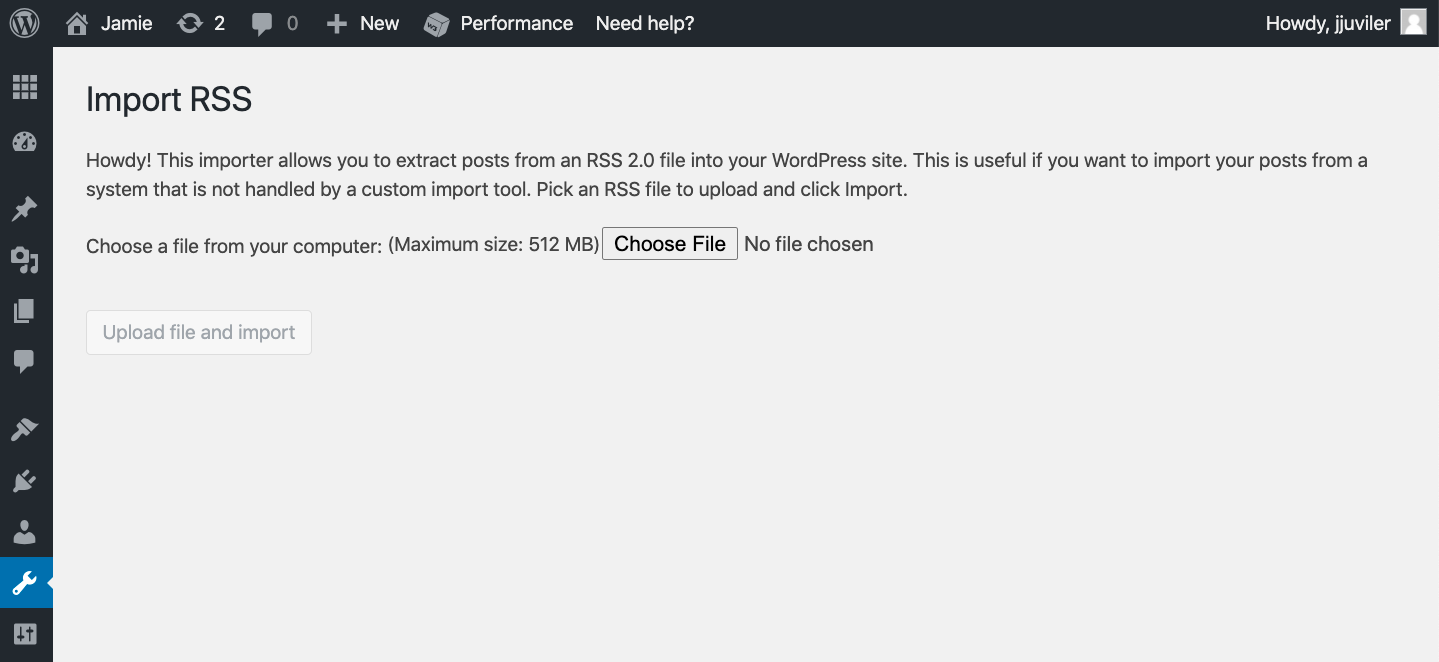
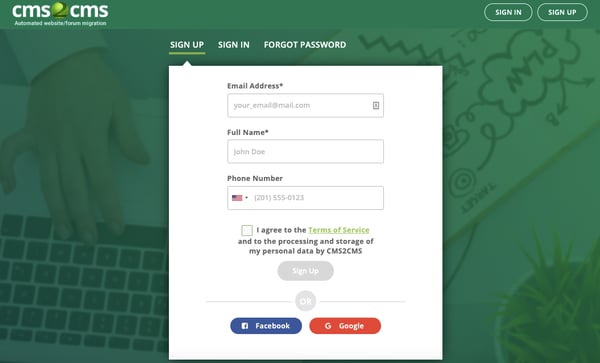
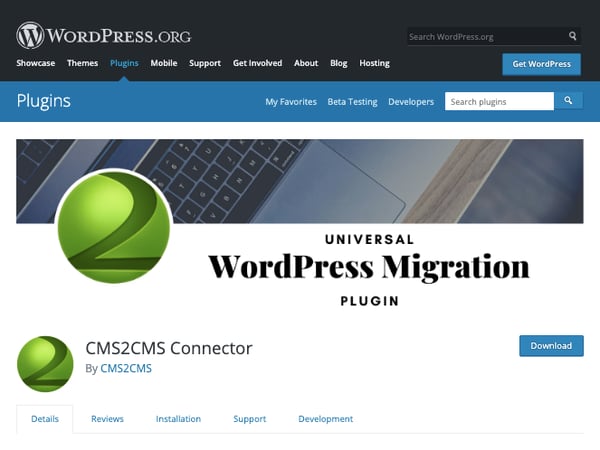
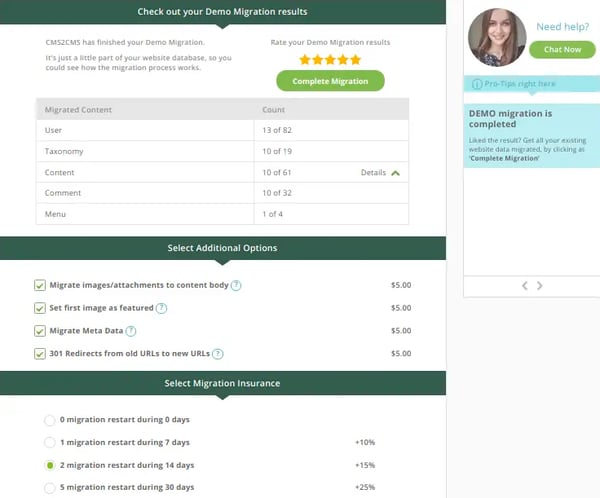
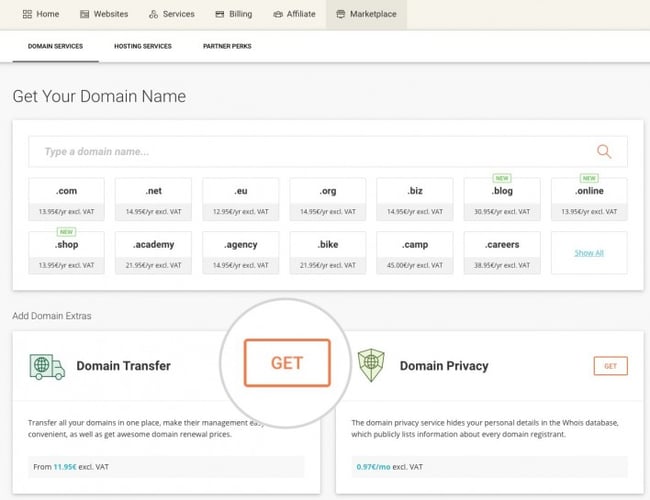
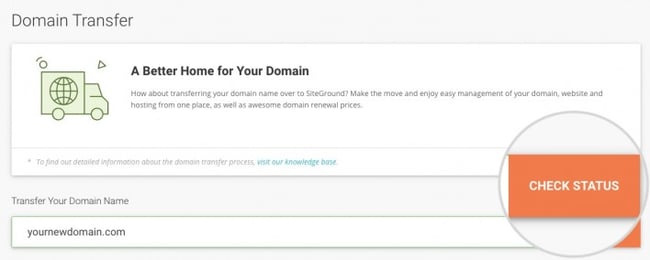
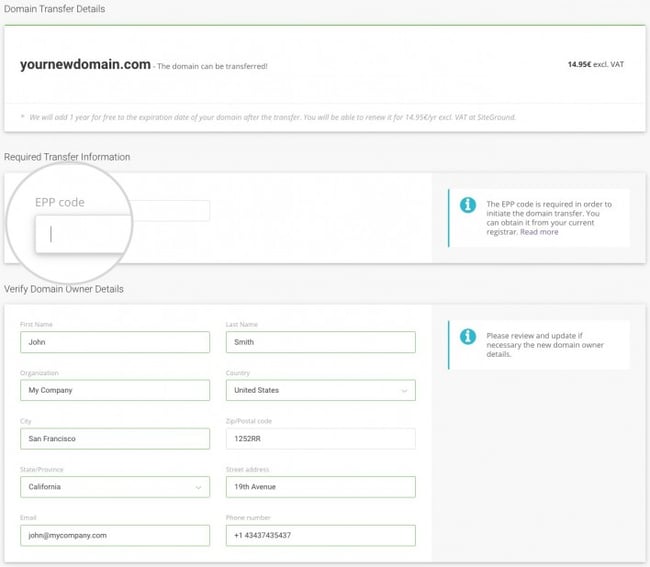
Wix is an easy and budget-friendly option for creating a website. It appeals to new website owners in particular because it takes care of the technical aspects of the site so you just need to sign up for a hosting plan, pick a theme, and start building pages with the drag-and-drop editor. As the needs and goals of your site change, however, you might want to use a plugin to better manage and engage your contacts with forms, live chat, and email marketing. Or you might want to add custom CSS code to create a sticky navigation menu. In sum, you realize you need the functionality and flexibility of a content management system to continue to grow your business online. The good news is you don't have to start from scratch. You can move your site to your own self-hosted domain on WordPress.org in two different ways. These are detailed in the migration phase. In this post, we'll break down the migration process into the following three phases: Before we begin walking through how to convert your site, let's look at the benefits of hosting your site on WordPress. Both Wix and WordPress are excellent options for building a website. Offering built-in functionality, templates, and add-ons, both platforms enable users without technical knowledge to create and customize a site without needing to code or even knowing how to code. When comparing Wix vs. WordPress, it's important to note that one isn't better than the other — it's just that they present two very different approaches to creating and managing a website. Wix is a website builder that offers the website building tools and hosting required to create and launch a site quickly. With Wix, you can purchase your own custom domain. You can modify over 800 pre-designed templates to quickly create your site, or start from scratch to completely customize it. You can even add video backgrounds, scroll effects, and animations to make these pages interactive and memorable. There are limits to how much you can customize the appearance and functionality of your Wix site, however. For example, you can't add forms or featured images to blog posts. You can't switch templates after your website goes live. And you can't access or change the HTML of your site. For users who don't have the time to use or manage a robust number of out-of-the-box features, add-ons, and custom code, Wix is ideal for creating a basic site with lots of visual content. Let's say you started on Wix, but your site and audience has grown substantially. You're looking to start blogging, install a tool to help you optimize your content for search engines, and completely rebrand your site. For the freedom and flexibility to do all this, you need a CMS. WordPress has the advanced content management features and customization options you need to extend the functionality of your site. With this multi-purpose CMS, you can easily add pages and posts, install WordPress plugins like the free and easy-to-use Elementor page builder and HubSpot WordPress plugin, customize the design of your site with hundreds of free and premium themes, and much more. In exchange for this flexibility, you will need to invest more time and effort into setting up your WordPress site. Unlike Wix, WordPress is a self-hosted platform, which means you'll need to find your own hosting and download the software. You'll also have to connect your domain (or purchase one if you were using a Wix subdomain). Most hosting providers simplify these processes — particularly with one-step installation of the WordPress software — so it's a popular choice for site owners. We'll explore these steps in detail below. Now we understand a few reasons why you might want to convert your Wix site to WordPress. We'll briefly mention two different ways you can migrate your content, and then walk through the entire process step-by-step. There are two ways you can convert your Wix site to WordPress. You can use the RSS feed to quickly import all your posts and then manually migrate your pages and images, or you can use an automated migration plugin. Since it's completely free, some site owners may opt to use the RSS feed method for budget reasons. While it will be more efficient than manually copying and pasting every single post and page into WordPress, it will still be time-consuming. That's because it only automates the migration process for your Wix posts. You'll still have to migrate your pages and images manually. It's also important to note that this option is only available to site owners who created their Wix site using the Old Wix Blog, which was replaced by the New Wix blog in 2018. That's because the RSS feed button is only built into the older version of Wix. Site owners who built on the New Wix Blog can use an automated migration plugin by CMS2CMS instead. Not only does this plugin work for any Wix site no matter when it was built — it also allows for a full data transfer. Your posts, pages, media, and other web assets can all be migrated. That means admins who want to save time and avoid any copying and pasting of their Wix content to WordPress will prefer this option. In the migration phase (or step 7), we'll take a closer look at both the semi-automated and fully automated option so you can pick the one that suits your needs best. The other pre- and post-migration steps in the list are the same, no matter how you choose to migrate your content from Wix to WordPress. Let's get started. Before you can begin exporting content from Wix, you need somewhere to import it. Below we'll cover the steps you need to take pre-migration. You'll need to sign up for a hosting service for your WordPress site. If you're looking for a similar experience to Wix, then try managed hosting. Managed hosting essentially means you partner with the hosting company to install and run your site on WordPress.org. The managed hosting provider will regularly cache your site, run malware scans and daily backups, and update your WordPress theme and plugins so you can focus on the non-technical aspects of running a site, like creating content and customizing the design. There are dozens of hosting providers to choose from and plenty of other types of hosting available. If you need some suggestions to start, SiteGround, WP Engine,and WPMU Dev offer managed hosting as well as other types of plans and have a reputation for reliability and high performance. Once you've selected a web hosting provider and type of hosting, you'll have to choose a plan that has the bandwidth, storage, and security required for your site. Most providers offer three plans with more features available at a higher price tag at each tier. You can take a look at SiteGround's hosting packages below. Image Source After selecting a web hosting plan, you'll be asked to either purchase or connect a domain. Since your Wix site is still live at this point, you can set up a temporary domain for your WordPress site. For the sake of this tutorial, let's say you selected one of the above hosting plans with SiteGround. You can see that SiteGround offers it as an option in its sign up process below. Image Source We'll discuss how you can transfer the custom one you purchased from Wix later. Now it's time to install the WordPress software. Most hosting providers offer an automated installation process. Let's walk through this process for SiteGround below. Image Source Image Source When the installation is complete, you'll receive a notification that your WordPress.org account is ready to use. There are only two more steps to complete before importing your Wix content to your new site. First, you need to change the permalink structure of your site in your WordPress dashboard to optimize it for search engines. To log into your dashboard, click Proceed to Customer Area and navigate to the My Accounts tab in your SiteGround account. Then click the Go to Admin Panel button. Image Source You'll be redirected to your WordPress admin dashboard. Navigate to Settings > Permalinks and select "Post Name." Image Source Last step before you begin importing content! While your posts, pages, and media content can be exported from your Wix site and imported to your WordPress.org site, your template can't be. The good news is you can easily find and install a WordPress theme for your new site. If you're interested in selecting a free theme from the WordPress directory, just click Appearance > Themes in your WordPress dashboard. Then, click Add New. From there, you can look at different themes and install one with the click of a button. If you're interested in premium themes, then you can check out StudioPress, Themify, and other third-party marketplaces. Once you find a premium theme you like, download it and return to your WP dashboard. You'll follow the same steps but instead of clicking Add New, click Upload Theme. You'll find the theme in a .zip file on your computer. Then click the Activate button. Now it's time to bring your content over. Below we'll walk through the two processes for exporting your Wix site. We'll start with the RSS feed option, then cover the automated migration plugin option. Using your RSS feed is only a semi-automated process. Meaning, it will automate the process of importing your Wix posts, but you'll have to import your pages and images separately and manually. To begin, you'll have to locate your RSS Feed. You can do so by adding /feed.xml to the end of your URL. So if your site address is www.example.com, type in www.example.com/feed.xml. Now that your RSS feed is open, right click anywhere on the page and select Save as. Make sure to change the file extension to .xml before saving it to your desktop. Now head over to your WordPress dashboard. On the left side of the screen, click Tools > Import. Scroll down to the RSS importer and click Run Importer. Click Choose File, then select the file from your desktop. Click the Upload file and import button. Once the file has been successfully imported, you'll want to ensure that all your posts are uploaded. Navigate to Posts > All Posts and scroll through the list. Besides some formatting issues you'll need to clean up, all your posts should now be on your WordPress site. Since the RSS migration only transfers your posts, you'll have to import your pages and media separately. Let's start with your pages. You'll have to add your Wix pages manually to WordPress. Most sites don't have many pages beyond a homepage, "About Us" page, "Products/Services" page, "Contact Us" page, and blog homepage so this shouldn't take too much time. Just log in to your Wix dashboard, navigate to your pages, and begin copying. In your WordPress dashboard, click Pages > Add New and paste. Repeat this process until all your pages are copied into WordPress. Now it's time for your images. You have two options for transferring your images from Wix to WordPress. Either way, you'll have to download the images from your Wix site manually and save them to your computer. You can then upload each one manually. To do so, click Media > Add New in your WordPress dashboard. Or you upload them in bulk via FTP. For a simpler method that requires no copying and pasting or coding, try an automated migration service instead. There are multiple automated migration services on the market, but we're going to focus on one called CMS2CMS. CMS2CMS can save you a lot of time without exceeding your budget. Before you commit, get a quote of your migration by entering the number of pages and taxonomies (tags and categories) your current site has into CMS2CMS's price calculator. Say your site is relatively small, with 100 pages organized into 20 tags and categories. CMS2CMS estimates it will likely cost less than $60 to convert your site from Wix to WordPress. Image Source Now that we understand the benefits of using this service, let's walk through the steps below. You first need to create a CMS2CMS account. This will prompt the CMS2CMS Migration Wizard. You'll fill in the form with the following information: You'll then be asked whether you want to use the Connector plugin or the Connector bridge file, which needs to be installed via FTP. Since the plugin is more beginner friendly, we'll choose that method. Once you click Download the Connector plugin, you'll be redirected to the CMS2CMS Connector plugin page in WordPress's official plugin directory. Please note that this plugin is free to download, but you will have to enter in your payment information to complete the migration. When downloaded, it will save as a zip file. You can upload it by navigating to Plugins in your WordPress dashboard and clicking Upload Plugin. Click Activate Plugin. You should now see CMS2CMS Connector on the left hand menu of your dashboard. Click it. Fill in your CMS2CMS account info and click Continue. In the next window, you'll select what assets you'd like to transfer from Wix to WordPress. Here are all the assets you can transfer. Image Source If you'd like to preview the demo migration, click Start Free Demo Migration. Otherwise, you can skip this step by checking the box labelled "Skip demo migration and migrate all data to your website." To complete the migration, select any additional assets you want to migrate and migration insurance. If you're satisfied with your settings and final quote, click Complete Migration. Image Source You'll then be prompted to fill in your payment information. Your migration will begin as soon as your payment is processed. Once you've successfully imported your Wix content to your WordPress.org site using one of the methods above, there's just one last step before you can launch your site. If you were using a free subdomain for your Wix website, then you'll just have to purchase a custom domain from your new hosting provider. However, if you had purchased a custom domain name from Wix, then you can transfer and register it on your new web hosting account. This will replace the temporary domain you set up. In your Wix account, just go to the Domains page. Scroll to your domain and click the Show More icon. Select Transfer Away from Wix. Image Source Click Transfer Domain > I Still Want to Transfer. Wix will then email you a code which will authorize the domain transfer to your new registrar. Hold on to this. You'll now have to initiate the transfer process on your new web hosting account. Let's take a look at the process on SiteGround below. This process costs $14.95 on SiteGround, but prices may vary depending on your hosting provider. Log into your SiteGround hosting account. Go to the tab Add Services. Next to the box labelled "Domain Transfer," click the Get button. Image Source A pop-up window will appear. Enter your domain name in the empty fields and click Check Domain Status. Image Source Once your domain status has been approved, you'll be asked to type in the code that Wix emailed you. Image Source Then confirm that you have access to the administrative email address of your SiteGround account, and update the domain owner info if necessary. Once you're ready, complete your purchase and the transfer will be automatically initiated. You will be notified when the transfer is completed in a welcome email from SiteGround. If you created a site with a website builder like Wix, it might be time to upgrade to WordPress or a WordPress alternative. Converting from Wix to a content management system can provide the flexibility and power needed to grow your site, delight your visitors, and stand out from your competitors. Editor's note: This post was originally published in April 2020 and has been updated for comprehensiveness. 
Why Convert from Wix to WordPress
How to Convert Wix to Wordpress
Pre-migration Steps for Converting Wix to WordPress
Step 1: Purchase Web Hosting

Step 2: Set Up a Temporary Domain

Step 3: Install WordPress

Step 4: Change Your New Site's Permalink Settings


Step 5: Install a Theme
 Image Source
 Step 6: Migrate from Wix to WordPress
Option 1: Export Wix Site Using RSS Feed
Importing Wix Posts Using RSS Feed Method

Importing Wix Pages Using RSS Feed Method

Importing Wix Images Using RSS Feed Method
Option 2: Export Wix Site Using an Automated Migration Plugin

Creating a CMS2CMS Account
Installing the CMS2CMS ConnectorPlugin


Setting up the Migration


Completing the Migration
Post-migration Steps for Converting Wix to WordPress
Step 7: Transfer (or Purchase) Your Custom Domain

Upgrading to a CMS


Originally published Feb 8, 2021 7:00:00 AM, updated March 18 2021
How Do I Transfer My Wix Website to Another Account
Source: https://blog.hubspot.com/website/convert-wix-to-wordpress
0 Response to "How Do I Transfer My Wix Website to Another Account"
Post a Comment